Using Google Classroom in the Art Room

I have been using Google Classroom for a while now as a one-stop-shop for students to access their resources, handouts, links, mark sheets and online portfolios. I wanted to share with you some ways that I use this app that have helped me to streamline mine and my students working practice.

USING TOPICS

Under the ‘+ Create’ button you will see the option to create topics. I have used this to help organize all of my uploads. This makes it easier for students to navigate Google Classroom and should save wasted time searching for their documents. The types of headings I have used are:

  • Handouts and Guidance sheets – This would contain items such as word banks, analysis sheets, annotation guides, Externally set task sheets etc
  • Cover work – Here I would upload any cover lessons and tasks that students are to complete in my absence
  • Homework – We now use ShowMyHomework but previous to this I would place the classes Homework task instructions here
  • Project titles – These are the topic headings that I have the most of. For example for my ‘The Basics’ project I would create a topic header of the same name.

Assignments

This is pretty straightforward, here I would add any lesson tasks that I want students to complete on Google Classroom. I will often add a blank Google Slides document for students to add their work to, making sure to set the document to ‘Make a copy for each student’. I use Google slides rather than Google Docs as I have found it to be more intuitive and user-friendly for students. I will also always add the lesson handouts/presentation so that students have access to these after the lesson should they wish to revisit their work or if they are absent they can see what has been worked on in class.

Material

So if I want to just share a resource for the lesson, such as a presentation, YouTube clip or link, I will upload it as Material rather than an Assignment. This means that it does not have a due date nor does it give the students the opportunity to upload/share any document with you.

Choosing the correct heading when adding items to Google Classroom means that students clearly see what they need to complete and hand in to you (an Assignment) and what is just for reference (Material). Material will not clutter up their ‘To Do’ list.

Online Sketchbook/ Portfolio

Utilising ‘Assignments’ I have created online sketchbooks for my GCSE Photography classes. This is especially helpful during Covid-19 as I do not have to worry about quarantining paper sketchbooks before I can touch/mark/view them and also I can see exactly what the students are doing real time without having to get close to them and breaking the 2m distance I am supposed to keep.

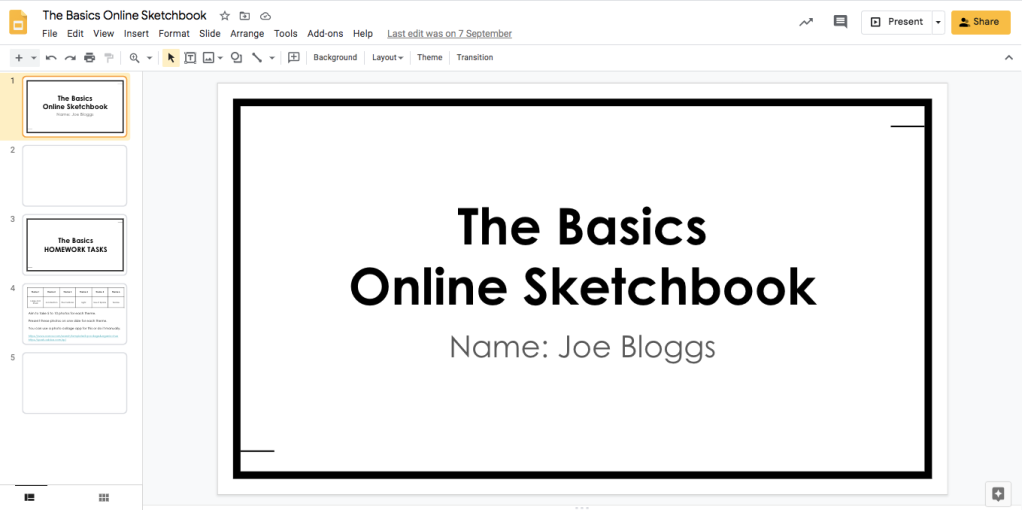
I set up the Slides document with the name of project and a space for the students name, then any homework lists/guidance and lastly I am planning on adding in their teacher marking tracker sheet too. Just remember to set the permission to ‘Make a copy for each student’.

Using comments to give feedback

Lastly one great feature of Google Classroom is that you can provide comments/feedback to students both in real time and/or after the student has completed the work. You can click on an item you want to provide a comment on or the whole sheet/page and then the speech bubble with plus sign in it. Students can then reply to your comment/feedback. A record of your comments/feedback and your students responses is kept, this can be seen by clicking the speech bubble with three lines in it at near the top right of the screen.

I hope you have found some of these tips helpful! Please do get in touch if you have further questions or want any more advice.

Joining the Bitmoji craze!

A screenshot of my final Bitmoji Classroom

I hope everyone is surviving and managing to enjoy some of the glorious sun we are having in the UK at the moment?

We as a school are using Google Classroom as our main remote learning platform at the moment and in my quest to upskill myself in this technology I have come across Bitmoji Classrooms.

I am a sucker for anything interactive and aesthetically pleasing so was instantly drawn to these but I could not work out how to incorporate them in to my Creative Arts lessons at Secondary school age.

So while I am pondering this I created one to be shared via to our whole school mental and physical well-being classroom – titled Stronger Together’. This is where we share useful resources, websites, articles, videos etc for students and staff.

Next week (Friday 5th June) is World Environmental Day, so I had a play about and created a Bitmoji classroom with links related to this as a trial. I have added my slide below for you as an editable copy and also my PDF version so you can see what the students would see.

If you are interested in creating your own Bitmoji to replace mine – you will need to download the app on your phone, create your avatar and then sign in on a computer to add it to your virtual classroom. There are TONS of how-to videos out there so have a Google if you are interested!

School Shut Down Lessons: Yr10 Photography

Angles, edges and corners at home example

I hope you are all managing the added stresses and anxieties we are all having at the moment. My school has requested that we prepare for possible shut down by creating lessons that can be delivered via Google Classroom.

I made a start on my Year 10 GCSE photography lessons first and I have decided to not continue with our current project but rather pause that for the time being. So I will be asking students to work on a number of mini tasks and projects to extend their photographic understanding and skills.

Most of these ideas I have developed but a couple have come from this website: https://theartyteacher.com/tasks-to-set-art-students-if-your-school-closes/ which has a number of other great ideas also.

I hope these are useful to you!

Lesson 1 – Street/City life Photographer Research

Research the work of a photographer who has investigated street/city life in their work. You may use the websites below as a starting point for your investigation.

https://www.featureshoot.com/category/street/

https://www.pinterest.co.uk/

Once you have selected a photographer you are interested in complete the following on the attached document.

  • Name of the photographer
  • 4 images of their work
  • A written analysis of one of their photos

Lesson 2 – Angles, edges and corners at home

Look around your home and see if you can find interesting angles, edges and corners to photograph. One idea is to look up! Look at the corners of the walls and ceiling in each room. Does the light change depending on what room you are in? Can you capture different tones on each wall? Take a range of photos and present them on the attached slideshow either using an App such as PicCollage which allows you to put your photographs in a grid or present them in an arrangement of your choosing.

Lesson 3 – Photographic Diary

Your lesson today is going to be spread throughout the day as your task is to create a photographic diary.  You can use a phone, iPad or camera to do this, but please think carefully about how you will present this. This diary will have no words because, as the saying goes ‘A picture speaks a thousand words’.  You might want to focus on the environment around you. (Buildings, interiors, landscapes) Or your photographic diary might be all about the people in your day. Be as creative as you like. Either use an App such as PicCollage which allows you to put your photographs in a grid or present them on a slide in an arrangement of your choosing.

Lesson 4 – Close Up Photography

Use your mobile phone,iPad or camera to take a selection of close-up photographs around your home or garden.  Try getting very close to objects. Think about unusual angles and perspectives. What different viewpoints do you get if you crawl around the room?  What great photographs could you take if you look inside objects, or lights or drawers? How can you make every-day objects look different or unusual by taking close-up photographs or cropping photographs?  Take at least 30 photographs and then select your best 9. Either use an App such as PicCollage which allows you to put your photographs in a grid, or present them on a slide in an arrangement of your choosing.

Lesson 5 – Photographic Textures

Use your mobile phone, camera or an iPad to take a selection of photographs around your home or garden that have texture.  Often when you get up close to wood, wicker, bark, carpet, clothing or other objects you can see the texture of their surface.  Take at least 30 photographs and then select your 9 best photographs that have an amazing texture. Either use an App such as PicCollage which allows you to put your photographs in a grid, or or present them on a slide in an arrangement of your choosing.

Lesson 6 – Exploring ‘The Expert Photography’ website

Follow the link below and explore the many articles on the site. Choose an article that appeals to you and read it. On the document attached complete the following (write in your own words – NO COPY AND PASTING:

  • Add the name of the article
  • What key information have you learnt?
  • Find example photos to add to your notes which help demonstrate the key information you have read
  • https://expertphotography.com/articles/

Lesson 7 – The Flat Lay

Read the attached article on creating flat lay photography (https://expertphotography.com/flat-lay-photography/). Using items you can find around your house and/or garden create your own flat lay photo/s. Present your best photos on the attached slideshow presentation. Title (name), date and note down the method of recording for each image. For example:

Work space

March, 2020

Iphone 11

Lesson 8 – Paper Experiments  

Using any paper you can find at home explore different ways of photographing it. You could try cutting it up, scrunching it, shining light through it, folding it etc. Try to zoom in close to your paper so that you do not get too much background detail, you want the focus to be the paper! Present your best photos in whatever style you like but they must be on the attached document. 

Lesson 9 – Five steps photographs

With your chosen camera in hand take 5 steps in any direction then stop! Do not move any further, then looking around you try to capture something you can see. Present your best photos in whatever style you like but they must be on the attached document. 

Lesson 10 – Explore the work of Ray Metzker

Many photographers have used light and shadow in their photographic work. Explore the work of the photographer Ray Metzker. Complete the following on the attached document.

  • Name of the photographer
  • 4 images of their work
  • A written analysis of one of their photos

Lesson 11 – Light and Shadow

Looking around your garden and/or house find shadows and sources of light. Capture these using an ipad, phone or camera. Consider looking at close up details, an unusual angle, an interesting composition or a play on colour. Present your best photos in whatever style you like but they must be on the attached document. 

Lesson 12 – Colour me red

Explore what is around you and seek out all the items that are the colour RED. Capture as many items as you can using an ipad, phone or camera. Present your best photos in whatever style you like but they must be on the attached document.